


Before diving into your crawl space and covering everything with plastic as a means of encapsulation, it is important to begin with a thorough audit. An initial assessment of your crawl space should identify any possible hazardous elements, as well as give you an opportunity to check how local codes suggest certain situations are handled. This will in turn speed up the whole project.
Download Now: Tips to Prepare for Your Crawl Space Encapsulation
Ten Helpful Tips for Your Crawl Space Project
Here are some things you need to examine and evaluate before starting your crawl space encapsulation:
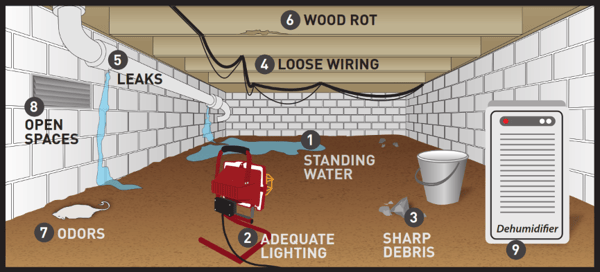
1. Before entering the crawl space, make certain there is no standing water.
If you find standing water, consult with a professional to remove it. Standing water can be a safety issue while working in a crawl space and can lead to possible electrocution.
2. Provide adequate lighting in the space before working.
Crawl spaces tend to be dark, so making sure you have enough visibility when working will help you make sure you haven't missed anything that could later compromise the integrity of the moisture protection system.
3. Prepare the floor area.
Since most crawl spaces will have dirt floors, remove sharp rocks or debris that may damage or penetrate vapor barriers during installation. Bring a bucket to ease the collection process. This is where that adequate lighting will come in handy. If the floor of the crawl space is uneven, flatten and smooth the soil with a rake. You may even need to consider bringing in more soil or stone to properly grade the floor of the crawl for drainage.
4. Ensure all electrical wiring is free of damage and strapped appropriately.
Strap and reinforce any free hanging ductwork. This makes the area easier to maneuver in during installation and provides better visibility. It also allows greater access to parts of the crawl space that would otherwise be more difficult to get to.
5. Check all plumbing pipes and inspect for signs of leaks or corrosion.
The last thing you want to do is cover up a water pipe that is about to leak. In cases like this, it is best to be preemptive. If you are unsure about the state of a pipe, call a professional and get a second opinion.
6. Examine all wood, framing, posts, and beams.
Check for wood rot, mold, or damage. Installing a vapor barrier over an already compromised surface is just masking a problem that can rear its head down the road.
7. Assess the area for odors.
This could be a result of dead rodents or mold. Although encapsulating the crawl space will help eliminate odors, removing the source before beginning the process is prudent.
8. Identify how many open spaces need to be sealed.
Two factors that affect the performance of a crawl space enclosure are: air sealing and insulation. These are the areas you'd want to seal in compliance with your local codes:
- Sill plates
- Rim joists
- Vents
- Any penetrations in the exterior wall and framing
9. Determine how the air in the crawl space will be conditioned.
When encapsulating a crawl space, building code requires the space have conditioned air1. If dehumidification is the method you’re going to go with, you’ll need the right size dehumidifier for your specific application. Here's a chart to help you determine what capacity of dehumidification you need depending on the size and conditions of your crawl space (these ratings are minimum size ratings).
| Crawl Space Area | |||||
|---|---|---|---|---|---|
| Current Condition of Space Without Humidifier | 500 Sq. Ft. | 1,000 Sp. Ft. | 1,500 Sq. Ft. | 2,000 Sq. Ft. | 2,500 Sq. Ft. |
| Moderately Damp | 10 Pints | 14 Pints | 18 Pints | 22 Pints | 26 Pints |
| Very Damp | 12 Pints | 17 Pints | 22 Pints | 27 Pints | 32 Pints |
| Wet | 14 Pints | 20 Pints | 26 Pints | 32 Pints | 38 Pints |
| Extremely Wet | 16 Pints | 23 Pints | 30 Pints | 37 Pints | 44 Pints |
These figures are estimates only. Pint values indicate dehumidification required in pints per 24 hours. Courtesy of the Association of Home Appliance Manufacturers.
10. Identify and select an appropriate vapor barrier for your crawl space.
The right barrier will prevent moisture vapor from entering the crawl space, be durable, and long lasting. Ideally, the liner will be part of a larger offered system that includes installation accessories that will make the project easier for you.
Utilize the Crawl Space Encapsulation Preparation checklist for your next project.
We’re here to make this as easy for you as possible!
Stego® Industries, LLC is a leader in moisture protection products and strives to exceed industry standards and client expectations. Contact us if you are looking for a high-quality vapor barrier for your crawl space that exceeds industry standards.
Sources:
1According to the 2012 IBC standard: Section 1203.3.2.4


Post Comments