


A 5-Step Guide to Protecting Your Structure from Termite Attack with a Non-Toxic Treatment Method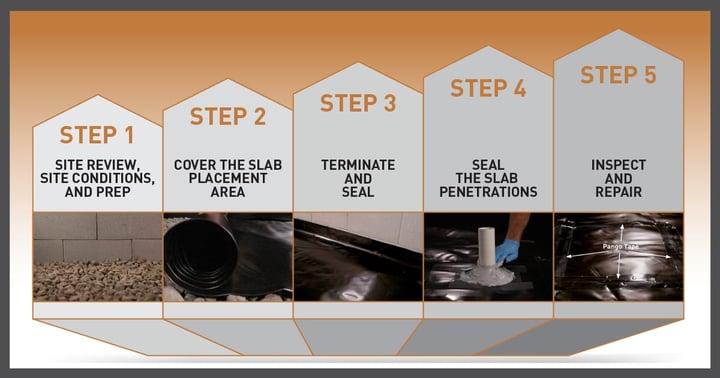
For many owners, protecting your building or structure from destructive termites is top-of-mind.
But, as they say, not all termites are created equal. From my experience, subterranean termites – the kind that live in the soil – can be one of the most invasive and destructive to buildings.
 That's why a critical component of a protection strategy is the creation of a barrier between your home and the subgrade where the foundation will be placed. It's best to address the needs in the design phase of construction, when you can choose products and strategies that will both protect the structure from termite attack and do so sustainably, without the use of pesticides.
As you can see, I clearly prefer and recommend a physical termite barrier – here’s why. A physical termite barrier does not “do” anything to termites. There are no pesticides in the product to kill or deter termites. Instead, a physical termite barrier is a non-toxic termite treatment that must rely on the inert physical character of the material to block termites from chewing through and reaching their desired food source: the wood structure and cellulose components of your home.
Another advantage to selecting a termite barrier during the design phase is that a physical termite barrier below a concrete slab foundation or in a crawl space can also provide moisture vapor protection. Your floors and indoor air quality, which can both suffer from unwanted and/or unchecked water vapor diffusion through an unprotected slab, will thank you later for doing so.
Wouldn’t it be nice if there were a vapor barrier that doubled as a physical barrier to termites as well? Interested? Read on…
I always tell contractors and homebuilders, when it comes to protecting “the first side” of your structure from moisture, soil gases, and subterranean termites, getting it done the first time can save difficult, expensive repairs later. And with slab-on-grade construction, you only have one chance to get your under-slab protection correct.
The good news is that you can install a 2-in-1 physical termite/vapor barrier below your slab or within your crawl space and it is essentially the same process as installing a vapor barrier or retarder. It should be a familiar process for contractors and an intuitive project for the DIY warrior.
There are, however, a few termite-specific considerations to the installation I want to share with you. A careful and thoughtful installation is very important to ensure the termite/vapor barrier will perform to your expectations. And a thorough review of the manufacturer's installation instructions is always warranted.
The one similarity between pesticide treatments and the use of a physical barrier is that the installation is critical to how well the product will perform.
This introductory step-by-step guide will identify the tools, materials, and know-how to install a below-slab physical termite/vapor barrier effectively and efficiently for a wide range of installation details. These details may be found on slab-on-grade construction and crawl space applications for residential and commercial structures alike.
General Project Overview
START TO FINISH: 4-6 hours for two people to complete 1,000 square feet
DIFFICULTY: Easy to moderate; depending on project-specific conditions
INVOLVES: Lifting, cutting, taping, and kneeling
What You Need
TOOLS:
- Utility knife or scissors
- Measuring tape
- Work gloves
- Protective eyewear
- Trash/recycling bags
- Knee pads (optional)
- Towel or rag
- 5-gallon bucket
- Trowel
- Disposal gloves (optional)
- Mixer (optional)
MATERIALS:
- Physical termite barrier/vapor barrier
- Barrier seaming tape
- Accessories for sealing the perimeter (terminating edges) and penetrations
Note: It’s important to use accessories from the same manufacturer as the barrier material to ensure compatibility. All accessories should have testing to prove their effectiveness in excluding subterranean termites.
Watch our video for a step-by-step guide on how to install Pango Wrap Termite/Vapor Barrier.
Step 1: Site Review, Site Conditions, and Prep
Installing a physical termite barrier is a very similar process to that of a below-slab vapor barrier or retarder. For those with vapor barrier installation experience, the following may be review, but as my high school football coach used to say, “prior preparation leads to peak performance.” So, before you get too excited and start rolling out the termite barrier, it is a great idea to review the site, prepare the subgrade, and plan the installation ahead of time.
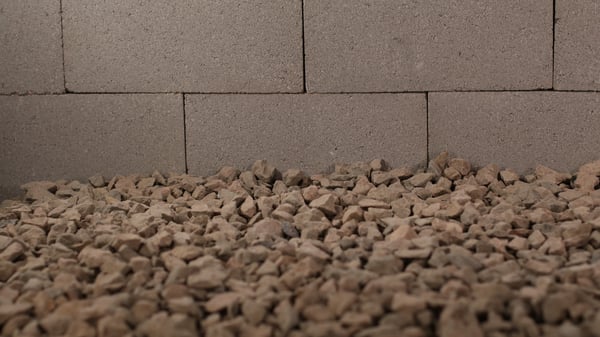
Prep Step #1 – Prepare Your Subgrade: Whether you are installing your termite barrier in a crawl space or under-slab, ensure that your subgrade is level and compacted. Both compacted earth and crushed rock are common as a base course, depending on code requirements and/or your specification.
When preparing for your termite/vapor barrier installation, be sure to review the unique building code requirements for your state. When it comes to crawl space encapsulation, some states will require a three-inch minimum gap between the top of the wall liner and the bottom of the wood sill.
Prep Step #2 - Review Plumbing and Utility Penetrations: Confirm plumbing and other sub-slab utility work is completed and located in the right spots. Note whether the penetrations are in a cluster (closely spaced together) or by themselves. The proximity of these pipes to each other will dictate which accessory products and methods will be most effective at sealing the termite barrier around these penetrations.
A couple of other notes: 1) In most instances, the termite barrier needs to be the outermost component of your under-slab or crawl space construction. 2) Pipe penetrations are often insulated with foam. It is important that the termite barrier be properly sealed to the pipe and not the foam insulation. Penetrations are a common entry point for termites, and we want to avoid creating a pathway through the insulation into your structure.
Prep Step #3 - Site Conditions and Material Storage: A physical termite barrier can be installed in any season and geographic location, but the weather can play a factor in your success. Weather events such as rain, snow, wind, mud, and temperature can all affect your ability to install a termite barrier efficiently. Check your product data sheets and installation instructions for guidance. Protect materials that contain adhesives from exposure to the elements and check your product data sheets for material storage recommendations.
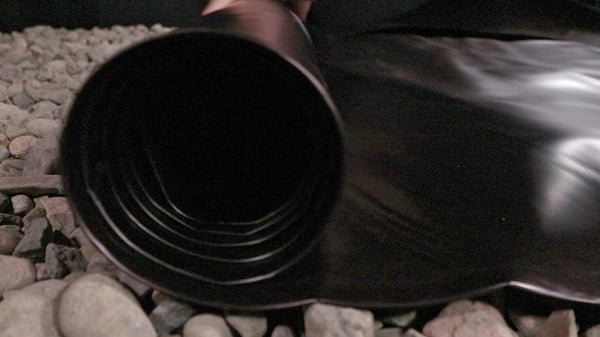
Step 2: Cover the Slab Placement Area
The goal of the termite barrier is to block termites from gaining entry from below the slab foundation through control joints, construction joints, pipe penetrations, and cracks in the concrete. A termite can exploit a crack in the concrete as narrow as the width of a standard business card, so 100 percent coverage is critical to the effectiveness of the barrier. Cover the slab placement area and seal at all termination points.
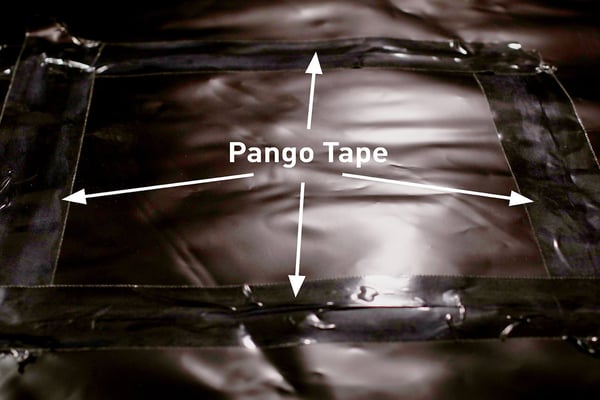
Overlap seams of the termite barrier a minimum of six inches. Use the manufacturer’s seaming tape to seal the overlaps. Here’s where protecting materials in Step #1 can be important: to ensure the adhesives on your seaming tape adhere to the barrier, ensure the barrier is free of any dirt, debris, moisture, or frost when applying the tape. A dry rag or towel works well to wipe it clean.
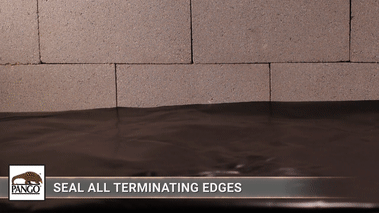
Step 3: Terminate and Seal
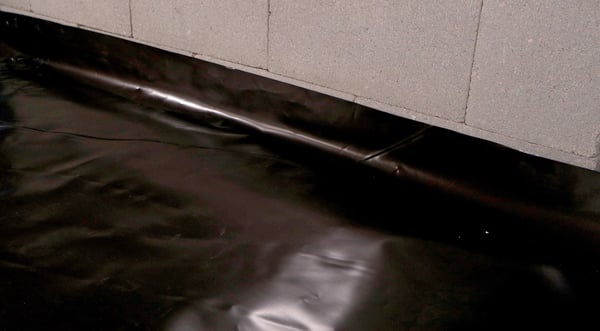
Where to terminate and seal your physical termite barrier requires a bit of consideration. Remember that a physical barrier will only provide protection where it is placed and sealed effectively. Typically, this termination point is going to be the exterior grade beam, stem wall, or the slab itself. Regardless of where the barrier is terminated, it should be uniformly sealed at all terminating edges. Depending on the design of your foundation, you may encounter interior termination points that will need to be sealed as well, such as interior grade beams and columns.
Termite Barrier Sealants: Sealing to existing concrete constructions (e.g., foundation stem walls) is generally the easiest option and typically provides the most protection. Ensure that the barrier seals against concrete and not rigid foam or other insulation (another reminder: the termite barrier should typically be the outermost component and the material that termites will encounter first). Extend barrier along the vertical wall or grade beam and apply it to a two-inch wide, minimum 60 mil thick strip of your termite barrier sealant. Be sure to stage your termite barrier prior to mixing/applying your sealant -- epoxy-type sealants have a limited window of time before they cure to the point that they are no longer workable.
Pro Tip: Termite barrier bond and sealants cure faster in warm climates, and it is critical to secure the term bar before it cures.
Make sure the termite barrier extends beyond the sealant placed on the wall or grade beam. Once the termite barrier is placed against the sealant and temporarily stuck in place, you’ll want to secure it to the concrete with a mechanical fastener such as a termination bar. Most masonry screws require you to pre-drill a hole into the concrete wall. If your termination bar has specific holes for a fastener, hold the term bar in place as a template to mark your holes with a marker.
Pro Tip: Drilling through masonry can be difficult and time-consuming, so consider renting a powder-actuated gun from your local tool rental or home improvement store to speed up your project!
Double-sided Tapes: Some specialty double-sided tapes are engineered to allow one side of the tape to adhere to the termite barrier film and the other side to seal/mechanically fasten to the concrete cast against it. In a monolithic pour, this type of double-sided tape is your best bet to seal the termite barrier to the new floor slab or grade beam as the concrete is being placed against it.
 Pro Tip: Some installers find it easier to seal the termite barrier at the perimeter edges first, potentially with a smaller perimeter detail strip. This can relieve a lot of weight and pressure at the edges and prevents the voids against a wall that can cause a "tenting" effect caused by reaching/stretching after rolling out hundreds of feet of material to cover the last few inches.
For specific installation details, review our Pango CAD Drawings.
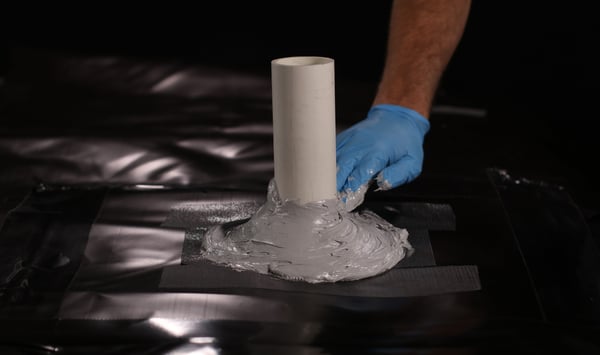
Step 4: Seal the Slab Penetrations
Slab penetrations are one of the most common areas where termites can invade your structure. Efficiently and effectively sealing these areas is a critical part of your installation. There are several options to seal penetrations. The number of penetrations and the spacing between them will determine the best method.
Minimal number of individual penetrations: Use a patch of termite barrier to minimize the void around the penetration, a collar to surround the pipe, and seal with seam tape. This is arguably a little more time-consuming and tedious than the other methods described below, but when only sealing a handful of penetrations, it’s no sweat.
When laying out your termite barrier, cut a slit to allow the pipe to pass through the termite barrier. Then use a detail patch (aka pipe boot) made from the termite barrier material large enough to overlap the damaged area by at least 6”. Cut an “X” in the middle of the detail patch about the size of the pipe to achieve a snug fit. Use the termite barrier seam tape to secure the detail patch to the wrap. Next, cut out a collar (see installation instructions) from the termite barrier material, surround the pipe, and seal to the penetration itself.
More than a few individual or loosely spaced penetrations: Use the same non-sag epoxy sealant that you used to seal your perimeter edge to seal these pipes. Mixing epoxy is messy, but it is also a huge labor saver when compared to constructing pipe boots. Be sure to stage every penetration ahead of time so that your epoxy doesn’t cure hard before you have your penetrations prepped.
Lay out your termite barrier and cut a slit to allow the pipe to pass through. Keep the gap between the barrier and the penetration to a minimum. Use the barrier seaming tape to repair and tighten up the damaged area around the pipe. Surround the pipe with textured double-sided tape to help anchor the epoxy, ensuring a tight seal. Mix and liberally apply the epoxy 360 degrees around the penetration and at least two inches above the termite barrier. You should be able to seal 20-30 individual penetrations per two gallons of epoxy.
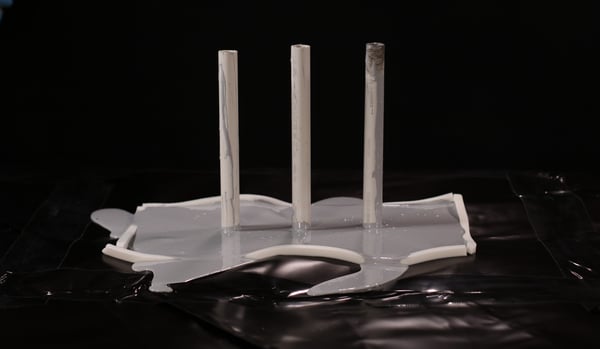
Tightly spaced pipe clusters: When tightly grouped pipe clusters are present, individually sealing them with a pipe boot or a non-sag epoxy can be difficult or sometimes impossible to accomplish. A self-leveling epoxy sealant is the answer for this difficult scenario. The self-leveling nature of this type of epoxy allows it to flow in between tight spaces and fill voids that otherwise would be left open to termite attack. Because a self-leveling epoxy will run, a sealant form surrounding the penetration will contain the epoxy. Simply create a dam with the sealant form 360 degrees around the cluster of pipes. Surround the area with double-sided tape to provide an anchor point for the epoxy. Then pour in your self-leveling epoxy and allow it to fill in all the nooks and crannies within the area of work.
 Pro Tip: It's recommended to minimize the gap between the wrap and the pipe when using a self-leveling epoxy. Using seaming tape to reduce the gap can also be helpful. If a large enough gap is present, much of the epoxy may simply drain down the hole and not seal around the pipes. If that happens, you may need to place a second application of epoxy after the first application has cured.
Step 5: Inspect and Repair
The final step is to walk your job site and inspect your installation.
- Pay close attention to your terminating edges and penetrations, ensuring that a uniform seal is present.
- Take a look at your overlaps and your seam tape…is the tape covering both edges of the termite barrier?
- Be on the lookout for any punctures or damaged areas. Some excess termite barrier material can simply be used as a patch if you encounter a damaged area. Just cover the damaged area with the patch and tape it down. Most under-slab physical barriers are extremely tough, so chances are any repairs needed will be minimal.
- Be aware of additional slab prep work and placement activity. Slab reinforcing (rebar or mesh), as well as general machine and foot traffic could lead to punctures or damage to the vapor barrier. Keep a roll of seam tape and some extra termite barrier material on hand to touch up the vapor barrier all the way up to and through concrete floor placement.
- Finally, try to avoid the use of stakes driven through the vapor barrier during concrete placement operations, like when screeding or bracing interior formwork. Those stakes create additional holes in the vapor barrier system that are difficult or impossible to repair during concrete placement. Check out vapor-safe accessory products here.
A Non-Toxic Approach to Under Slab and Crawl Space Termite Control is Underway
That is a physical termite barrier installation in a nutshell. There are undoubtedly construction scenarios and details not discussed in this article that you may encounter. I can’t emphasize this enough: make sure you refer to the project specifications, system installation instructions, and product data sheets before you get started. Another great resource for any technical or installation questions is your product manufacturer’s representative. Getting your termite protection right the first time is the goal. The right materials and resources will help you get there.
“Prior preparation leads to peak performance!” ...Thanks, Coach.


Post Comments