.png?width=1500&name=2024StegoCorp-Logo%20(3).png "2024StegoCorp-Logo (3)")


Encapsulating your crawl space is a great way to improve the condition and value of your home.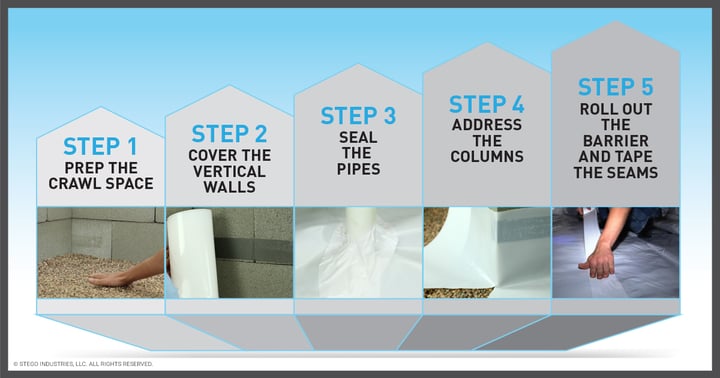
Tired of that funky, unidentifiable smell wafting from your floors?
The scratching sounds of uninvited four-legged guests from below?
Do you feel like you can't get your home to your desired temperature, no matter what you do?
It can be frustrating to feel like you're stuck.
Encapsulating your crawl space is a straightforward way to deal with many of these problems. A clean, sealed crawl space with a high-performance vapor barrier can eliminate odors by impeding mold growth and improving indoor air quality, blocking entry to rodents and insects, and helping ease the latent load on your HVAC system – improving its efficiency. The resulting space can also provide additional room for storage beneath your home.
This step-by-step guide for DIY crawl space encapsulation will identify the materials, techniques, and shortcuts to properly encapsulate your crawl space.
General Project Overview
START TO FINISH: 8-10 hours for two people to complete 1,000 square feet
DIFFICULTY: Moderate to High (Difficulty is partially dependent on the amount of clearance your crawl space has. The tighter the work area, the more difficult)
INVOLVES: Cutting, drilling, taping, working in tight spaces
What You Need When Encapsulating Your Crawl Space
TOOLS:
- Plenty of lighting: flashlight, headlamps and/or utility lamps
- Utility Knife
- Drill with masonry bits
- Measuring tape
- Work gloves
- Protective eye wear
- Trash bags
- Disposable breathing mask
- Knee pads
- Marker
- Rubber paint roller (optional – refer to *Pro Tip below)
MATERIALS:
- Crawl space vapor barrier or retarder
- Vapor barrier seam tape
- Double-sided construction tape
- Termination bars or other mechanical fasteners
- Concrete Screws
Watch our video for a step-by-step guide on how to encapsulate your crawl space using StegoCrawl products.
Crawl Space Encapsulation Step #1: Preparation
Cleaning out the crawl space to prepare it for encapsulation might be the hardest part of the job, depending on the age of your home and its previous owners.
Chances are, your crawl space is not an area of your home where you spend a lot of time – at least we hope not. You may discover, however, that many other living things have found the area beneath your home to be ideal for acorn storage, breeding or eternal rest.
We also cannot help you find a new home for the very old, rusted-out equipment abandoned there for the past several decades by a previous owner. Don’t dismiss that junk too quickly, though; sometimes crawl spaces are full of treasure.
While sometimes arduous, cleaning and clearing the crawl space will provide a good “wellness check” for your home.
Prep Step #1: Avoid Standing Water
The first thing you’ll need to look for is standing water – you don’t want to risk electrocution when you bring power and/or lighting into the area to get the job done. If you have standing water, you’ll want to consult a professional before entering the crawl space.
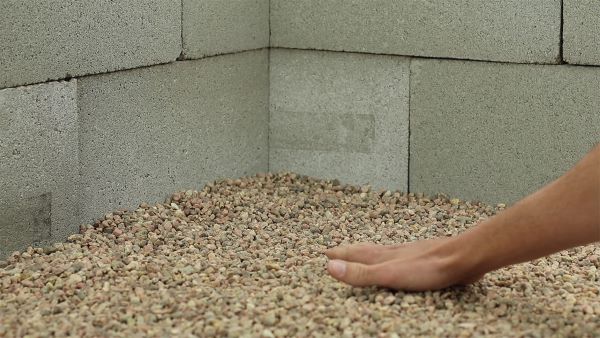
Prep Step #2: Clean and Clear the Crawl Space
Once it’s safe to enter, get that crawl space clean and clear of old poly, old/wet insulation, sharp rocks or other debris. Most building codes require the crawl space vapor barrier to be used on the ground. This even applies where you plan to use rigid insulation – install the vapor barrier on the ground first. For your own safety and comfort while working, get this surface as smooth as you can.
Prep Step #3: Crawl Space Wellness Check
You’re almost ready to start, but it’s best to finish that “wellness check” before you move forward. This includes things like loose wiring – do you need to call an electrician to check anything out?
How are the pipes – do you need a plumber? What about wood rot and/or termite damage? Get help from experts first, now that you’ve provided them a clear path to get to any problem spots.
Prep Step #4: Conditioned Air
One final step before getting started: you’ll need to determine how the air in your crawl space will be conditioned. Whether you need items like a dehumidifier in the space may determine how and where you locate your insulation and drainage.
With a clean and clear crawl space, you’re ready to begin your crawl space DIY encapsulation project!

Crawl Space Encapsulation Step #2: Get Started with the Walls First
So that you’re most efficient with your material, you want to address the vertical surfaces first. The wall liner, which will be in a fixed position, will eventually tie into the horizontal ground cover. So, the foundation walls are the best place to start to ensure excess material from your wall liner that turns onto the horizontal plane is overlapped with the ground vapor barrier at 6” (further explanation below).
Note, it’s important to leave a small gap at the top of your masonry walls to comply with your local building code. If your local building code does not specify the size of the gap to leave at the top of your masonry walls, leave three inches exposed for your termite inspector to do their job.
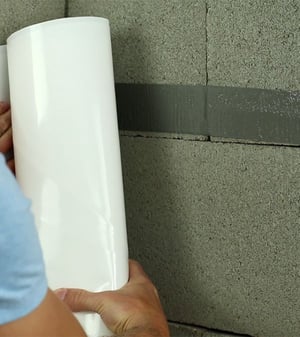
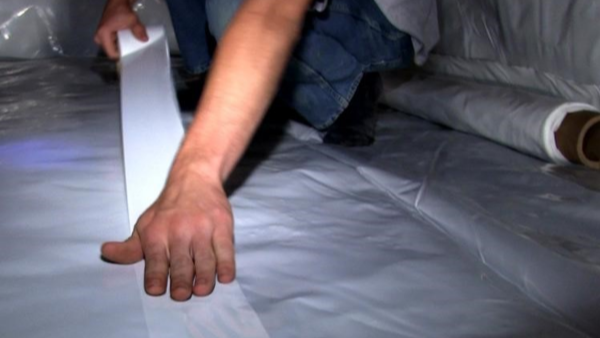
Start by applying the double-sided construction tape to the masonry wall. This super-sticky double-sided tape will effectively hang your installation in place until you can secure it with a mechanical fastener, such as a termination bar. Remove one side of the release liner a little bit at a time – move slowly along the wall, pressing the adhesive down firmly to ensure you’re moving in a straight line and to avoid a sticky mess.
*Pro Tip: Before removing the second release liner, to make sure the double-sided tape is really pressed into the wall, go back and forth over the double-sided tape with a rubber paint roller.
Once you’ve applied the double-sided construction tape to your masonry wall, remove the exposed release liner to get ready to apply the vapor barrier.
Pro Tip: Find a lightweight vapor barrier roll intended for vertical surface application. When looking for a vapor barrier manufacturer, it’s best to choose a product offered in a variety of rolls sizes and dimensions for ease of installation.
Unroll the vapor barrier along the vertical wall and apply it to the exposed, double-sided tape. Remember, this tape is sealing your crawl space from harmful moisture and odors, so apply it firmly and evenly around your masonry walls.
Make sure the vapor barrier extends higher than the double-sided tape. Once the vapor barrier is stuck to the walls, you’ll want to secure it to the concrete with a mechanical fastener like termination bars. Most masonry screws require you to pre-drill a hole into the concrete wall. If your termination bar has specific holes to hit, hold the term bar in place as a template to mark your holes with a marker.
Pro Tip: Drilling through masonry can be difficult and time-consuming, so consider renting a powder-actuated gun from your local tool rental or home improvement store to speed up your project!
Crawl Space Encapsulation Step #3: Pipes and Penetrations – Keep it Simple
Don’t roll out that vapor barrier yet! Again, the most efficient way to encapsulate your crawl space is to address all the fixed position areas first so that holds true for any pipes or other utility penetrations going from the ground into your house.
It’s best to work around these tricky spots with small detail patches of material. By sizing the vapor barrier to each penetration and cutting slits in the material to fit around tight spots, you’ll save a lot of time and effort trying to roll out material in these areas.
Then tape everything down with seaming tape. Remember, your completed installation will create a monolithic seal of your crawl space from vapor and soil gases. This includes your pipes and other penetrations, so seal the vapor barrier tightly around each pipe or penetration with the seam tape.
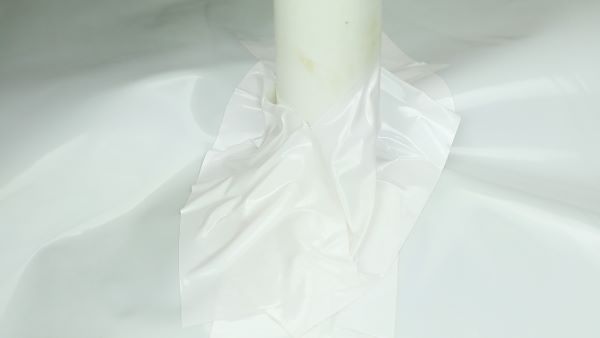
Crawl Space Encapsulation Step #4: Columns – You've Got This
If your crawl space includes columns – typically masonry – you’ll want to prepare these next.
Good news: you already know how to do this. Prepare the columns the same way you prepared the foundation walls, using double-sided construction tape first, the same lightweight/smaller vapor barrier used on the vertical walls, and termination bars.
Pro Tip: While your foundation walls probably included enough vapor barrier material to lay flat on the ground, this excess material can make columns a little trickier. At each corner of the column, cut a relief slit into the material so it lays flat. This will allow for a tight, four-sided encapsulation of the column while also providing you a nice seaming target to use when you roll out the material on the ground.
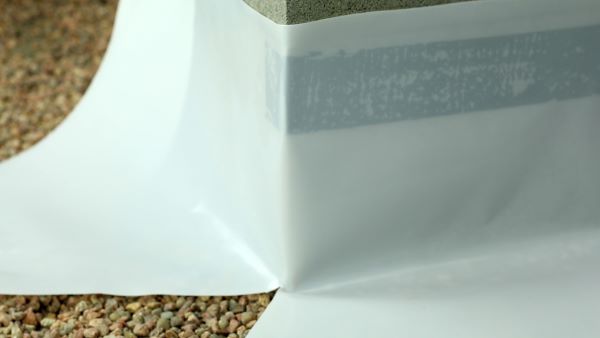
Crawl Space Encapsulation Step #5: Almost There – Time to Roll Out the Vapor Barrier
If you’ve followed these steps, now it’s time to roll out the vapor barrier to completely cover the surface of your crawl space.
Pro Tip: Some manufacturers provide a range of roll dimensions and a wider roll dimension for the ground cover could save you time, effort, and materials like seaming tape.
Whether you’re overlapping two seams of material, running up against your walls or other detail work, be sure to overlap every seam by at least six inches.
Tape down all seams with seaming tape and you’ve done it!
Other Crawl Space Encapsulation Variables to Consider
This step-by-step encapsulation guide covers most crawl spaces we’ve encountered. There are, however, other scenarios you may encounter, like crawl space vents. Don’t despair, we have a guide for that, too!
Congratulations! You’re on your way to turning your dank crawl space, replete with smells, junk, and critters into a healthier environment that will benefit the entire home above it. An encapsulated crawl space can do wonders for your indoor air quality, pest control, and energy efficiency. While you still won’t be hanging out down there (we hope), enjoy!


Post Comments