


Protecting Your Home’s Concrete Foundation from Moisture is Critical, but Shouldn’t be Daunting
More than ever, homeowners are researching and recommending the products, materials, and systems that will make their new home’s construction energy-efficient, durable, and sustainable.
But where to start?
There are so many important components and considerations that go into building a new home. For homeowners and home builders, the research, understanding, and selection of necessary and innovative products or systems is a big part of the process. The ‘what’ that will go into their new home’s construction gets most of the attention.

But for many materials that are part of a new home, effective installation (the ‘how’) is also critical to the overall design and high-performance goals. This is especially true for components of the home’s envelope (the parts of the structure that separate the conditioned living space from the outdoor environment) where the initial installation represents the best chance to get it done right. And nowhere does this hold more true than on what we call “the first side of the building,” the home’s foundation.
The below-slab vapor barrier certainly falls into this category. Notice, I say “vapor barrier” not mere plastic or poly – there's a difference. This is the highly engineered plastic extrusion that should go directly beneath your concrete slab. It helps to protect the home’s foundation from water vapor that can destroy your expensive flooring, and from soil gases like radon that can threaten the indoor air quality of your home and its inhabitants.
There are some important considerations when evaluating and selecting a below-slab vapor barrier, or below-slab vapor retarder, with the role it plays in achieving a healthy, resilient, and energy-efficient home. But don’t discount a thoughtful installation. After all, once the concrete floor slab is placed, the underside of the foundation slab is one of the most difficult and expensive parts of the building to access if things weren't done right the first time.
Fortunately, no matter who is installing the below-slab vapor barrier, the job itself is generally straightforward, quick, and certainly does not have to be intimidating.
This step-by-step guide will identify the tools, materials, and know-how to install a residential below-slab vapor barrier effectively and efficiently for a new home build.
General Project Overview
START TO FINISH: 4-6 hours for two people to complete 1,300 square feet
DIFFICULTY: Easy to moderate; depending on project-specific conditions
INVOLVES: Lifting, cutting, taping, and kneeling
What You Need
TOOLS:
- Utility knife or scissors
- Measuring tape
- Work gloves
- Work boots
- Protective eyewear
- Trash/recycling bags
- Knee pads
- Towel or rag
- Tape roller
- Bulk sausage/caulking gun
MATERIALS:
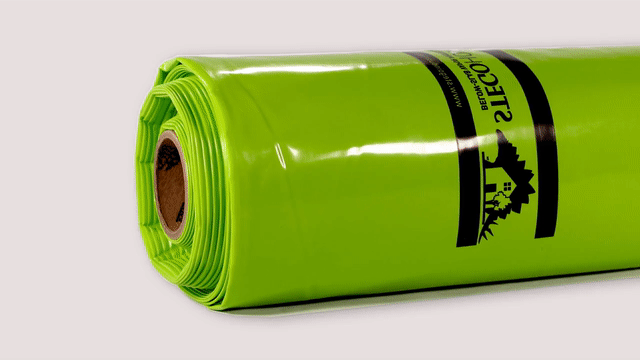
- Vapor barrier or vapor retarder
- Vapor barrier seam and sealing tape
- Accessories for sealing the perimeter and penetrations
Watch our video for a step-by-step guide on how to install StegoHome Below-Slab Protection in a new home.
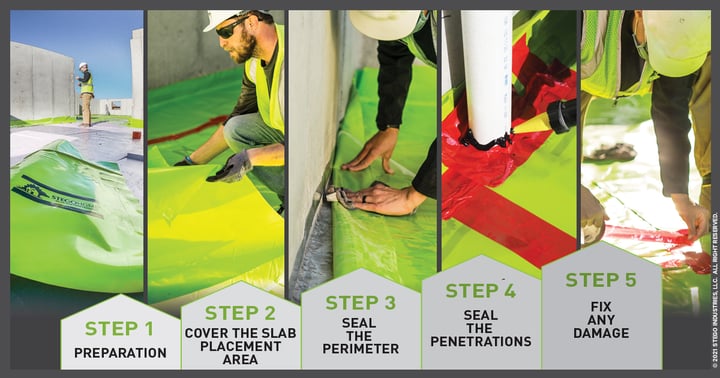
Step 1: Preparation
The residential below-slab vapor barrier installation will likely take place immediately prior to the placement of the steel reinforcement and concrete floor slab. So, there are a few things to consider or review prior to starting the installation.
- Prep Step #1 - Review Plumbing and Utility Penetrations: Confirm plumbing and other sub-slab utility work is completed and located in the right spots. The vapor barrier will cover and be sealed around them, so it’s worth double-checking now.
- Prep Step #2 - Subbase Preparation: The concrete floor slab needs an appropriate subbase to be placed upon. In most residential applications, this will be a tamped earth subgrade or crushed rock base course, depending on local code requirements and/or geotechnical or structural considerations.
A couple of other notes: 1) In some areas, a layer of sub-slab floor insulation may be used. This shouldn’t affect the vapor barrier installation but is something to be aware of and to consider. 2) Historically, a layer of sand has been commonly used below or above (or both) a vapor barrier to act solely as a protection course. But with higher-performance vapor barriers compliant with the strength requirements of the ASTM E1745 standard, protection layers of sand are likely not needed (saving a step(s) and money).
Regardless of the base material (dirt or rock), remove any foreign debris and compact the base to help minimize any irregular or sharp components that could potentially damage the vapor barrier during installation or slab placement. This is one area where vapor barrier selection and consideration around durability during installation makes a big difference.
- Prep Step #3 - Consider Installation Conditions: Although the vapor barrier can be installed any time of year and in any geographic location, it is probably worth checking the weather forecast. An installer will likely have a much better experience if there is some flexibility to avoid rain, snow, or extreme temperatures.
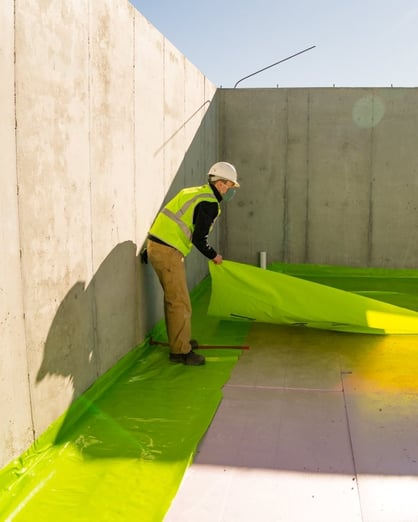
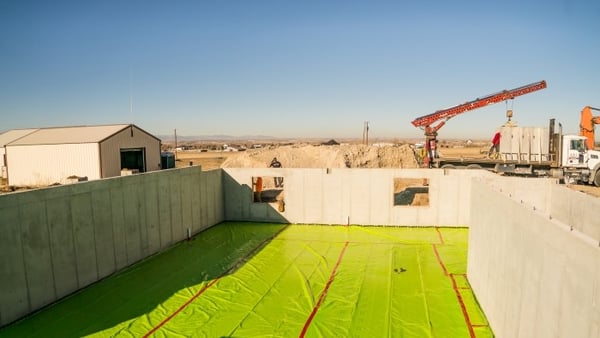
Step 2: Cover the Slab Placement Area
The purpose of the high-performance vapor barrier is to stop soil vapor from migrating into the concrete slab and home’s envelope over time. Roll out the vapor barrier to cover the entire floor slab placement area. A good rule of thumb is to imagine taking a bird’s eye view: if you can’t see the subbase (dirt or rock probably), then you’re doing great!
Pro Tip: Some manufacturers provide a range of roll dimensions and weights to provide installation efficiency.
Overlap seams of the vapor barrier a minimum of six inches and tape down the seams with the manufacturer’s engineered seaming tape or approved method. Make sure the vapor barrier is free of any dirt, debris, moisture, or frost when applying the tape. A dry rag or towel works well to wipe it clean. Applying some pressure to the taped seam (roller or foot) helps ensure better initial adhesion.
Note: When the vapor barrier is also serving as a component to a radon mitigation system, the industry requirement is a minimum 12-inch overlap at the seams.
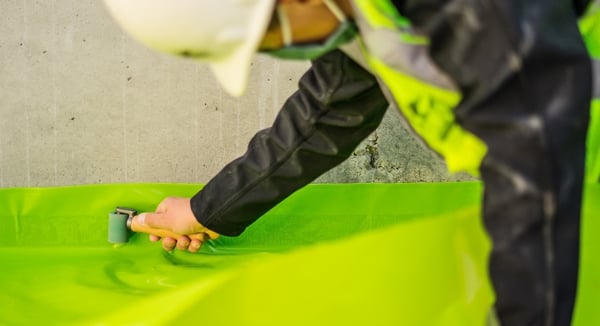
Step 3: Seal the Perimeter
The vapor barrier should be sealed at all termination points. Keep in mind, residential foundation characteristics can vary by region and project, but termination points usually include the perimeter of the slab placement area, like at a concrete stem or basement foundation wall. In addition, this may also include interior elements like grade beams or columns. Soil vapor (particularly soil gases, like radon) can migrate even via small gaps and openings, so the goal is to create a consistent, relatively vapor-tight seal at terminating edges.
When possible, try to lap the vapor barrier up at the slab edge so that it stops close to where the top of the placed slab will be. It doesn’t have to be exact; you can always run it long and cut it clean later.
Double-sided construction tapes can provide a super-aggressive option to seal the vapor barrier to an existing concrete (or masonry or rigid foam) wall. Some double-sided tapes are even engineered to allow the vapor barrier to seal into the fresh concrete of the new floor slab itself as it is placed against the vapor barrier, which is useful when the slab is placed monolithically against forms or impediments that exist, like rebar.
Low permeance mastic-type sealants are another option for sealing around a slab perimeter, but make sure to wear disposable gloves…they can be a little messy. This is where mastic in a sausage tube and applied by bulk gun could be handy.
Regardless of the perimeter sealing option you choose, be sure the adhesion area is free of dust, debris, moisture, or frost. Some surfaces (like concrete) may benefit from a stiff brush or vacuum if the towel isn’t quite doing the job of getting it clean. In addition, firm and added pressure along any sealing point of the vapor barrier will always help maximize adhesion.
Pro Tip: Some installers find it easier to seal the vapor barrier at the perimeter edges first, potentially with a smaller perimeter detail strip. This can relieve a lot of weight and pressure at the edges and prevents the voids against a wall that can cause a "tenting" effect caused by reaching/stretching after rolling out hundreds of feet of material to cover the last few inches.
Step 4: Seal the Penetrations
Remember those plumbing and utility penetrations you double-checked earlier? It’s important to seal those too. The same low vapor permeance tape used to seal the seams can be used to seal around sub-slab penetrations. It can be a little tricky to get the vapor barrier to fit snug around vertical pipe penetrations as it is first rolled out. Don’t worry…just cut the vapor barrier so it can lay flat around the pipes initially.
If the gap between the pipe and vapor barrier is minimal, nice work! Go ahead and seal it.
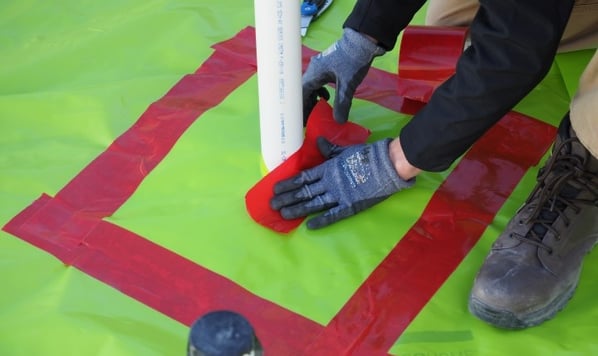
If the gap is larger (no worries) a detail patch or boot is helpful. Use some extra vapor barrier material to create a square boot that extends beyond the pipe at least 6 inches on all sides. Cut an “X” in the middle of the boot about the diameter of the pipe penetration. Press it down over the pipe to get that nice snug fit. Seal the base of the pipe, as well as tape down the four sides of the boot to the existing vapor barrier.
Ensuring there is a consistent, tight seal between the edges of the vapor barrier and the full base of the penetration is the goal…no need to overdo it.
Pro Tip: Some homes could have a lot of penetrations grouped close together. It’s still important to seal the voids between each of those pipes, so a low permeance mastic sealant can provide a labor-saving approach compared to wrapping each pipe with tape.
Step 5: Fix Any Damage
The last step is to walk around and repair any missed or damaged areas. Some excess vapor barrier material can simply be used as a patch for any holes or rips. Just cover the damaged area with the patch and tape it down. If you’re using a vapor barrier that has been engineered with high strength and durability, chances are there will be significantly less potential damage, saving labor costs and headache.
Be aware of additional slab prep work and placement activity. Slab reinforcing (rebar or mesh), as well as general machine and foot traffic could lead to punctures or damage to the vapor barrier. Keep a roll of tape and some extra material on hand to touch up the vapor barrier all the way up to and through concrete floor placement.
Finally, try to avoid the use of stakes driven through the vapor barrier during concrete placement operations, like when screeding or bracing interior formwork. Those stakes create additional holes in the vapor barrier system that are difficult or impossible to repair during concrete placement.
Check Out Vapor-Safe Accessory Products Here
That’s it! Way to go! Another new home protected with an effectively installed residential below-slab vapor barrier. The envelope of your new home’s construction will be drier, cleaner, and more energy-efficient for years to come.
Note: This step-by-step guide is based on the guidance outlined in ASTM E1643 – Standard Practice for Selection, Design, Installation, and Inspection of Water Vapor Retarders Used in Contact with Earth or Granular Fill Under Concrete Slabs. Always reference full manufacturer installation instructions prior to beginning any below-slab vapor barrier installation.


Post Comments